Your portal for all Smart Life App information

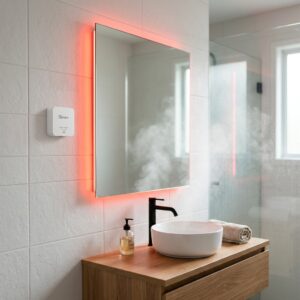
Preventing mold in your bathroom doesn’t require expensive ventilation overhauls. By combining a cheap SONOFF Zigbee/Wi-Fi Humidity Sensor with a Smart RGB LED Light Strip inside the Smart Life App, you can create an instant visual indicator that tells you exactly when to open the window – and when it’s safe to close it again.

In this guide, we’ll walk you through setting up this simple DIY visual mold warner step-by-step.

article_image_smart_mold_warner

Before starting, make sure you have the following gear connected to your Smart Life account:

Image Brand Title Price Action
SONOFF Smart Humidity & Temperature Sensor SONOFF Smart Humidity & Temperature Sensor $16.90 Buy Now
DAYBETTER 100ft LED Strip Lights Daybetter DAYBETTER 100ft LED Strip Lights Waterproof RGB LED Rope Lights with App Remote Control, Music Sync,12V Self-Adhesive LED Tape Lights for House Patio Deck100 FT (3 Rolls of 32.8ft) $29.99 Buy Now
MOES Tuya ZigBee 3.0 Hub/Wired Gateway MOES Tuya ZigBee 3.0 Hub/Wired Gateway, Smart Home Bridge Remote Controller $39.99 Buy Now

Step 1: Physical Placement of Your Devices

Proper placement ensures accurate readings and a great visual effect:

  1. Mount the Humidity Sensor:

    • Stick the SONOFF sensor on a bathroom wall or cabinet at about head height.

    • Important: Keep it away from direct water splashes (like inside the shower enclosure) to protect the electronics and prevent skewed liquid readings.

  2. Install the LED Light Strip:

    • Mount the strip behind your bathroom mirror, under a floating shelf, or along the vanity kickboard for indirect, ambient lighting.

Step 2: Add Devices to the Smart Life App

  1. Open the Smart Life App.

  2. Tap the + icon in the top right corner and select Add Device.

  3. Put your SONOFF Humidity Sensor into pairing mode (hold the reset button until the LED flashes).

  4. Follow the on-screen prompt to pair both the sensor and your LED Light Strip to your home Wi-Fi/Zigbee network.

  5. Rename your devices clearly (e.g., “Bathroom Humidity Sensor” and “Bathroom LED Strip”).

Step 3: Create Automation #1 – The Mold Warning (High Humidity)

This rule turns the light RED when humidity spikes after a shower.

  1. Navigate to the Scene tab at the bottom of the Smart Life App and select Automation.

  2. Tap + to create a new automation.

  3. Condition (IF):

    • Select When device status changes ➔ Choose Bathroom Humidity Sensor.

    • Select Humidity ➔ Choose > (Greater than) ➔ Set to 65% (Adjust based on your local climate/room baseline).

  4. Task (THEN):

    • Select Run the device ➔ Choose Bathroom LED Strip.

    • Set Switch ➔ ON.

    • Set Color / Mode ➔ Red (100% Brightness).

  5. Tap Save and name it: Bathroom - High Humidity Warning.

Step 4: Create Automation #2 – The Reset (Normal Air Quality)

This rule resets the light back to a normal color once you’ve ventilated the bathroom and humidity drops.

  1. Create another new automation in the Scene tab.

  2. Condition (IF):

    • Select When device status changes ➔ Choose Bathroom Humidity Sensor.

    • Select Humidity ➔ Choose < (Less than) ➔ Set to 50%.

  3. Task (THEN):

    • Select Run the device ➔ Choose Bathroom LED Strip.

    • Set Color / Mode ➔ Warm White (or Soft Yellow / Soft Blue).

  4. Tap Save and name it: Bathroom - Humidity Normal Reset.

Step 5: Test Your Setup

  1. Take a hot shower or use a warm damp cloth near the sensor to trigger a spike in humidity.

  2. Once humidity crosses 65%, the LED strip will instantly glow RED.

  3. Open your bathroom window or turn on the exhaust fan.

  4. As fresh air enters and humidity drops below 50%, watch the LED strip change back to Warm White!