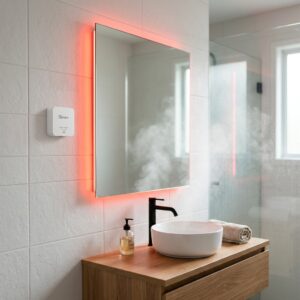
Preventing mold in your bathroom doesn’t require expensive ventilation overhauls. By combining a cheap SONOFF Zigbee/Wi-Fi Humidity Sensor with a Smart RGB LED Light Strip inside the Smart Life App, you can create an instant visual indicator that tells you exactly when to open the window – and when it’s safe to close it again.
In this guide, we’ll walk you through setting up this simple DIY visual mold warner step-by-step.
Before starting, make sure you have the following gear connected to your Smart Life account:
| Image | Brand | Title | Price | Action |
|---|---|---|---|---|
|
SONOFF | Smart Humidity & Temperature Sensor | $16.90 | Buy Now |
|
Daybetter | DAYBETTER 100ft LED Strip Lights Waterproof RGB LED Rope Lights with App Remote Control, Music Sync,12V Self-Adhesive LED Tape Lights for House Patio Deck100 FT (3 Rolls of 32.8ft) | $29.99 | Buy Now |
|
MOES | Tuya ZigBee 3.0 Hub/Wired Gateway, Smart Home Bridge Remote Controller | $39.99 | Buy Now |
Step 1: Physical Placement of Your Devices
Proper placement ensures accurate readings and a great visual effect:
Mount the Humidity Sensor:
Stick the SONOFF sensor on a bathroom wall or cabinet at about head height.
Important: Keep it away from direct water splashes (like inside the shower enclosure) to protect the electronics and prevent skewed liquid readings.
Install the LED Light Strip:
Mount the strip behind your bathroom mirror, under a floating shelf, or along the vanity kickboard for indirect, ambient lighting.
Step 2: Add Devices to the Smart Life App
Open the Smart Life App.
Tap the + icon in the top right corner and select Add Device.
Put your SONOFF Humidity Sensor into pairing mode (hold the reset button until the LED flashes).
Follow the on-screen prompt to pair both the sensor and your LED Light Strip to your home Wi-Fi/Zigbee network.
Rename your devices clearly (e.g., “Bathroom Humidity Sensor” and “Bathroom LED Strip”).
Step 3: Create Automation #1 – The Mold Warning (High Humidity)
This rule turns the light RED when humidity spikes after a shower.
Navigate to the Scene tab at the bottom of the Smart Life App and select Automation.
Tap + to create a new automation.
Condition (IF):
Select When device status changes ➔ Choose Bathroom Humidity Sensor.
Select Humidity ➔ Choose > (Greater than) ➔ Set to 65% (Adjust based on your local climate/room baseline).
Task (THEN):
Select Run the device ➔ Choose Bathroom LED Strip.
Set Switch ➔ ON.
Set Color / Mode ➔ Red (100% Brightness).
Tap Save and name it:
Bathroom - High Humidity Warning.
Step 4: Create Automation #2 – The Reset (Normal Air Quality)
This rule resets the light back to a normal color once you’ve ventilated the bathroom and humidity drops.
Create another new automation in the Scene tab.
Condition (IF):
Select When device status changes ➔ Choose Bathroom Humidity Sensor.
Select Humidity ➔ Choose < (Less than) ➔ Set to 50%.
Task (THEN):
Select Run the device ➔ Choose Bathroom LED Strip.
Set Color / Mode ➔ Warm White (or Soft Yellow / Soft Blue).
Tap Save and name it:
Bathroom - Humidity Normal Reset.
Step 5: Test Your Setup
Take a hot shower or use a warm damp cloth near the sensor to trigger a spike in humidity.
Once humidity crosses 65%, the LED strip will instantly glow RED.
Open your bathroom window or turn on the exhaust fan.
As fresh air enters and humidity drops below 50%, watch the LED strip change back to Warm White!